
Day 3: How Do Fossils Form?
Unit Navigation
STANDARDS OVERVIEW
Reading Strategy:
Practice skimming and scanning for specific information.Science Concept:
Fossilization of organisms occurs in many different ways.Reading TEKS:
4.9D, 4.9F, 4.13A, 4.13CScience TEKS:
2018–19: 4.2F; 2024–25: 4.3B, 4.3CNGSS:
4-LS1-1, 4-ESS3-1CCSS:
W.4.7Science and Literacy Connection:
Scientists do a lot of reading as they expand their knowledge about a topic they are investigating. Being able to find the specific information they need efficiently is important.Science Language:
- Observation is carefully looking at something or someone to gather information.
- Organisms are living things that are able to carry out the actions needed to live, grow, and survive.
- Fossils are the preserved remains or impressions of plants and animals from a past geologic age.
- Sedimentary rocks, where fossils are usually found, are formed by compressed layers of minerals and organic matter.
- Impression fossils are prints or indentations left in soft Earth materials, such as sand, silt, or mud.
- In compression fossils, the plant is physically compressed, or flattened, but some plant matter remains.
- A mold fossil is a depression left in sediment after a plant has completely decayed. A mold fossil is deeper than an impression fossil.
- In the process of petrification, plants or plant parts turn into stone when they are saturated with dissolved minerals that harden over time. This is how petrified wood is formed.
- Microfossils are tiny plant or animal fossils that are smaller than 1 mm (about the size of a pinhead) and can only be seen through a microscope.
-
Mini-Lesson
OVERVIEW
Today’s mini-lesson should be used to review and practice the reading strategy introduced yesterday: skimming and scanning for specific information. Teachers are encouraged to use this time to best meet the needs of their learners.
PROCEDURE
Teachers can determine if the mini-lesson will be facilitated with the whole class or with a particular inquiry circle that needs additional support. If you are working with a specific team, we suggest your other learners spend additional time working in inquiry circles. You may want to return to the information in the mini-lesson from Day 2 with some or all of your teams.
-
Inquiry Circles
OVERVIEW
Scientists often work in teams when conducting inquiry and investigations. Today, we will work in inquiry circles to investigate different questions about the representative plants. It is important to note that the inquiry circles are focused on the four representative plants (mosses, ferns, conifers, and flowering plants) that they will also be exploring in their science investigations. Since it is not possible to observe all of the members of a large group of plants firsthand, scientists must turn to text resources to expand their knowledge.
Prior to starting the inquiry circle work, be sure to have texts and technology available for your learners. Remember, you have been provided with a “Plants Resources” spreadsheet that contains a list of suggested books and media. These are suggestions, and you may use other resources. You may need to provide learners with specific instructions on how to access websites within your school district or you may want to create a click sheet of approved websites for learners to be distributed in your learning management system (Google Classroom, Schoology, etc.). As the children begin investigating, you may have some teams working online while others are working with traditional texts. This will depend on your access to technology and texts.
Materials for the Inquiry Circles:
Each team needs:
- team Inquiry Chart
- pencils
- access to informational texts/media
Teacher needs:
- “Plant Resources” spreadsheet for ideas
PROCEDURE
Each italicized statement below contains suggested wording the teacher may choose to use for the lesson; additional teacher actions and considerations are in parentheses.
Before Inquiry Circles
- It is time to get into your inquiry circles. I will remind you which inquiry team you’ll be working in.
- You will be with the same team as yesterday, but we will rotate the science roles. Remember that each team member has a role or a job within your team. (Assign roles at your discretion and have the Equipment Directors gather the Inquiry Chart for their team.)
- Yesterday we became familiar with the Inquiry Chart and generated our inquiry questions. We also recorded what we already know about the representative plants. Today you will start by choosing one question about your representative plant and looking for answers to that question.
- As you look for answers to your question, you will practice your roles as scientists. You will do this because scientists have a special way in which they look for answers. One way scientists look for answers is through investigations. This includes looking at text (in books and on the computer) to find information they can use.
- Scientists also record their findings in an organized way. You will record your findings on your team Inquiry Chart. (You may want to show or project the blank sample Inquiry Chart from yesterday.)
During Inquiry Circles (20 minutes)
- Today and for the next few days, you will investigate your representative plant by using preselected websites on the computer (or tablet) and preselected texts.
- We have anchor charts to help guide your thinking. Do not forget to use them while working. (Refer to the “Inquiry Toolbox” anchor chart and the “Skimming and Scanning for Specific Information” anchor chart. Remind learners that they will practice the literacy mini-lesson during inquiry circle time each day. Once you have taught several mini-lessons, learners can use any of the reading strategies taught, not just the one for that day.)
- The Lead Scientist will guide the inquiry for the day by picking which question(s) will be answered. The Data Scientist will record all source information and the answers to your inquiry question on the team Inquiry Chart. (You may want to explicitly show learners which square to write in.)
- Remember, it is important to record on your Inquiry Chart where you found the information (source) so that you do not plagiarize. (Point out to learners where sources are located on the Inquiry Chart and how one source may answer multiple questions. Remind your learners to record the title and author for texts and the title and URL for websites or videos. Point out that the same process to record will be used for books, websites, or even video resources.)
- Everyone should help find the answers to the questions online and in texts. Remember to work as a team, helping each other locate the answers to your question. (Be sure to model for learners where to record their source and where to record answers to specific questions. Explicitly show them how the Inquiry Chart will organize their progress.)
- My role is to help guide the inquiry circles, but I expect you to work as a science team to solve your problems together. (While teams are working, walk around the room to facilitate as needed.)
After Inquiry Circles (10 minutes)
- As we conclude our inquiry circles for today, each team will have a chance to share the information they found related to their questions, what they accomplished, and what literacy strategies they used. The Lab Director will lead the team’s discussion about today’s results. What has the team learned about its representative plant? What problems did the team encounter? How did the team resolve those problems? Did the team use a reading strategy? Which one and how did it help? What new questions does the team have? (After you have allowed the teams to gather their thoughts, have the Data Scientists share with the class. Try to encourage teams to share a variety of things—you do not want just facts about plants, just reading strategies, or just cooperative learning strategies.)
- (After all teams have shared, thank them for their hard work, and point out any excellent behaviors that you observed. If you saw an outstanding example of using a reading strategy or collaborative work, explicitly point it out. If you notice any problems in the teams during the lessons, take a moment to point them out, and explain your expectations for all future inquiry circles. Collect all Inquiry Charts or have learners put them in their normal classroom place for ongoing work so they can easily access them.)
-
Guided Science Investigation
OVERVIEW
Learners conclude their work with the excavation sites today by presenting their finding; then view a slideshow to learn more about how plants are fossilized.
GUIDING QUESTIONS
What information does our fossil give us? What are some of the ways that plants can become fossils?
BACKGROUND INFORMATION FOR THE TEACHER
Fossils are typically found in sedimentary rocks. Sedimentary rocks form through the geologic processes of weathering, erosion, deposition, compaction, and burial. Over time, the remains or evidence of plants and animals that once lived are preserved through physical, chemical, and biological processes called fossilization. Sometimes, fossilization occurs when the plants and animals are covered by soil sediments before they decay. Physical and chemical changes turn sediments into lithified rock (rock that is formed when sediments are compressed over time). Sedimentary layers and their fossil contents provide scientists with evidence of past climates and changes in the Earth’s crust over time.
In this lesson, the focus will be on the fossilization of plants. Plants are typically fossilized in the sediments of a body of water, and they are not as common as animal fossils because plants break down so quickly. Leaves are the most common plant fossils and can appear as impression, compression, mold, cast, and petrification fossils.
Impression fossils are two-dimensional imprints, or indentations, made in fine-grained sediments, such as clays, silts, sand, and mud. Over time, the plant decays and disappears, and all that remains is the imprint in the hardened rock (impressions do not contain any organic material).
In compression fossils, the plant is physically compressed, or flattened, during compaction and burial, and some organic matter remains preserved, typically in the form of carbon.
Mold and cast fossils are formed from the remains or the hard parts of a plant, such as the stem or roots. Mold fossils are the mineralized depressions, or cavities, left in Earth materials (like mud or sandstone) by a plant after it decays or rots away. Molds are three dimensional and deeper than impressions. Over time, if the mold is filled with another material, such as mineralized sediment, it becomes a cast that recreates the shape of the original parts of the organism.
Permineralization is the process by which “hard water” (water with a high concentration of minerals) flows through the ground and deposits minerals, typically silica, into the remains of once-living organisms. As a result of permineralization, the organic material is slowly replaced by the minerals and turns to stone, a process called petrification. Petrified wood is an example of this kind of fossilization.
Materials for the Guided Science Investigation:
Each team member needs:
- science notebook
- pencil
- goggles
Each team needs:
- labeled paper grid map from Day 1
- paper plates with fossil pieces
Teacher needs:
- “Fossils” slideshow
SETUP
- Prepare to project “Fossils” slideshow after learner presentations.
DAILY OBSERVATIONS
There are no observations at this time.
PROCEDURE
Engage
- Ask, Are all paleobotanists ready to share what they found in their fossil dig? Instruct the teams to collect the plates with their fossils, their science notebooks with sketches, and the paper grid maps.
- Tell them that the team Data Scientist will give a short explanation of the team’s excavation, explaining how the team used the paper grid map. Then team members can share their notes and sketches of the fossil they unearthed, explaining what it is and describing what they see (leaves, stems, seeds, etc.).
Explore/Explain
- As each team present its findings, encourage the other teams to ask questions about the presenting team’s work.
- Teams may have missing parts to their fossil. Listen for their reasoning about why that is (e.g., only excavated 4 out of 6 sites, pieces broken too small, unable to find or reconstruct?). Share that this happens in real-life excavations too.
- After all teams have had a chance to present, congratulate them on their work. Remind them that the previous day’s fossil exploration was a simplified example of how paleobotanists excavate and reconstruct plant fossils. Reveal that every minute they worked in class could be translated into months or even years on an actual dig. Ask them to share their ideas about how the model fossil dig compares to a real fossil dig.
- After discussion, instruct Lab Directors to collect and return all materials to the designated area.
- When ready, begin the slideshow. (NOTE: the following content is included in the notes section of the slides.)
- Slide 1 (Plant Fossils/title slide): Remind learners that they are working as teams of paleobotanists. The fossils they explore in this unit will all be plant fossils.
- Slide 2 (Where can we find fossils?): Ask learners to share their ideas with another team member or classmate. Allow a minute to do this, then randomly select learners to share their ideas. Accept all responses.
- Slide 3 (Sedimentary Rocks): Ask learners why they think fossils are only found in sedimentary rocks. Accept responses. Let’s learn about how sedimentary rocks are formed.
- Slide 4 (Explain the sedimentary process using slides 4 and 5):
- Large rocks are broken down into smaller pieces by a process called weathering, caused by water, wind, ice, heat, and living things.
- The broken pieces of rock are transported by water, wind, ice, and gravity to settle on the bottoms of bodies of water. The larger pieces drop out into rivers or streams, and the smaller pieces, called sediments, continue further into the oceans.
- When organisms die in a body of water, they may be buried a layer of sediments before they rot.
- Slide 5:
-
- Over time, layers of sediments build up on top of each other, and the weight of these layers press down on, or compress, any organisms within the layers.
- Dissolved minerals in the water fill up tiny spaces in the organism.
- Pressure from the top layers, chemical reactions from the dissolved minerals, and time turn the sediments into rock, and the organisms may become fossils. They remain in the rock until the layers are eroded or excavated.
- Slide 6 (paleontologist): Read the text on the slide and point out how this paleontologist is looking at fragments of rocks, reinforcing the fact that fossils are rarely found intact.
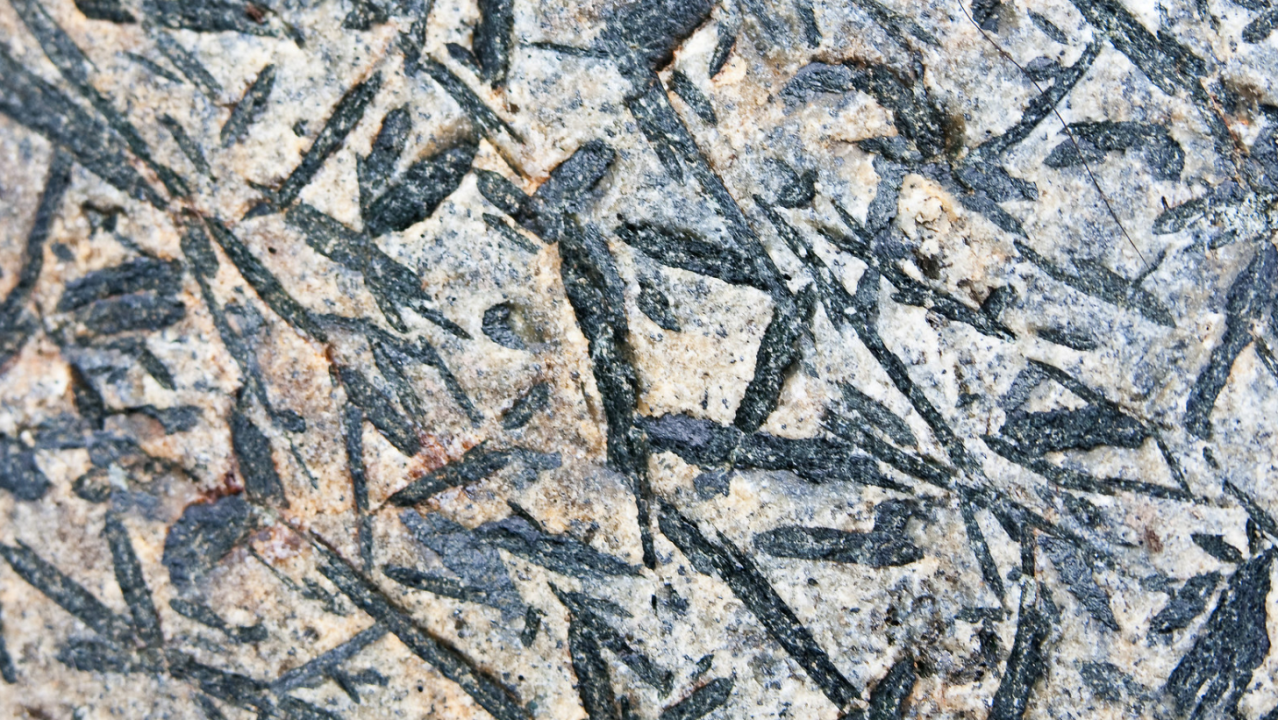
- Slide 7 (paleobotany): Read the text on the slide. Explain to learners that they are looking at a fossil of the extinct plant species Diplopteridium holdenii (Pteridospermopsida).
- Slide 8 (How do plant fossils form?): Tell learners that they will explore the different ways plants can become fossils.
- Slide 9 (plant fossils are not common): Read the text on the slide. Ask learners if the examples on the slide look like leaves they have seen before, but do not identify the slide images as ferns.
- Slide 10 (impression fossil): Read the text on the slide. Point out the impressions on the rock and compare these two-dimensional prints to making a fingerprint on paper. Add that, like a fingerprint, only the outline (impression) of the plant remains on the rock that was once soft Earth material such as clay, sand, or mud.
- Slide 11 (compression fossil): Read the text on the slide. Point out the dark areas on the rock and explain that these dark areas are not leaves anymore but the fossilized remains of plant matter.
- Slide 12 (mold and cast fossils): Read the text on the slide. Point out how this imprint looks “deeper” than an impression. Use an example such as making a footprint in the sand or mud—it will be deeper and leave a good impression of the foot. Then, if you filled the footprint with plaster, the dried plaster would become a cast that looks like the foot.
- Slide 13 (another example of mold and cast fossils): Read the text on the slide. Point out the root casts of the once-living plant.
- Slide 14 (petrification): Read the text on the slide. Point out the different colors of minerals that have formed in the petrified tree trunk. Slowly, and over a long period of time, the minerals from water where the tree was buried replace the organic materials and turned it into stone.
- Slide 15 (microfossils) Read text on slide. Explain the specimen has been tinted with color to show details better.
Elaborate
- After the slideshow, ask learners if they can identify what type of plant fossil they found in their “dig” (impression fossil). Accept responses. How do they know? (It looks like a print; it’s flat.)
- Ask learners to turn and share with a partner something new they learned about fossils today. Listen to their responses as you move between them.
- Announce to the class that tomorrow they will begin to use fossil evidence, along with live plants, to investigate how plants and environments changed on Earth over long periods of time.
Evaluate
- Did learners communicate any prior or new knowledge about fossils or the sedimentary process?
- Were any new questions raised about their work or about fossils?
-
Expanded Standards
Reading TEKS:
4.9D: Recognize characteristics and structures of informational text. 4.9F: Recognize characteristics of multimodal and digital texts. 4.13A: Generate and clarify questions on a topic for formal and informal inquiry. 4.13C: Identify and gather relevant information from a variety of sources.
NGSS:
4-ESS3-1: Obtain and combine information from books and other reliable media to explain phenomena. 4-LS1-1: Construct an argument with evidence, data, and/or a model.
CCSS:
W.4.7: Conduct short research projects that build knowledge through investigation of different aspects of a topic.
Science TEKS:
2018-19: 4.2F: Communicate valid oral and written results supported by data.
2024-25: 4.3B: Communicate explanations and solutions individually and collaboratively in a variety of settings and formats. 4.3C: Listen actively to others’ explanations to identify relevant evidence and engage respectfully in scientific discussion.