
Day 2: What Are Fossils?

-
Mini-Lesson
OVERVIEW
Scientists generally engage in a lot of reading, including reports that others have written and articles about the topic they are studying. With this large volume of reading comes the need to locate and read for specific information in a way that is efficient and effective. Today, learners will be introduced to a reading strategy often used by scientists: skimming and scanning for specific information.
Note: You are encouraged to create the “Skimming and Scanning for Specific Information” anchor chart with your learners as you move through the lesson, using the provided anchor chart as a model. Post it for easy reference when completed and remind learners to refer to the anchor charts during inquiry circles.
PROCEDURE
Each italicized statement below contains suggested wording the teacher may choose to use for the lesson; additional teacher actions and considerations are in parentheses.
Tell what the strategy is (declarative knowledge)
- Today we will learn a strategy that will help us locate information in texts quickly. That strategy is called skimming and scanning. Skimming and scanning means I quickly look across the text, looking for key words. When I find those key words, I slow down and start reading. Skimming and scanning is the same thing I do when I stand in the cereal aisle at the grocery store and look for my favorite cereal. I don’t read every name of every single box of cereal. Rather, I skim and scan across the boxes, looking for the color of my cereal box. Sometimes I see boxes that are the same color as my favorite cereal, so to be sure I have the right one, I stop and read the name of the cereal. I use similar procedures when I skim and scan text for specific information.
- Yesterday, you probably used “skimming and scanning” as you explored books about plants. Most likely, you did not read every word in those books. You probably looked quickly at the pages and stopped to look closer at parts that were most important for your purpose: deciding which representative plant interested you the most.
Tell when and why to use the strategy (conditional knowledge)
- Skimming and scanning is an important strategy for scientists (as readers) because they often have lots and lots of materials to read. They are reading these materials to see what other scientists have said about their topic and to find answers to some of the questions they are asking. As a reader I know to use skimming and scanning when I’m looking for specific answers to the questions on my Inquiry Chart. I use skimming and scanning because I don’t need to read every single word on every single page of a text. I can also use skimming and scanning to locate specific information online.
Tell how to use the strategy (procedural knowledge)
- I first read the question I am trying to answer. I then make a note of key words that the author of the text might use. This is the same as noting what color the box is of my favorite cereal.
- Next, I skim and scan the text for those keywords. I don’t read everything along the way, I just move my finger across the text, looking for those words. Sometimes the words appear in the pictures and captions or graphs, so I have to look at those too.
- Once I find the key words, I then slow down and read, paying attention to whether the text answers my question or not.
- If the text does answer my question, I make an entry on my Inquiry Chart. If it doesn’t, I either continue skimming and scanning or get a different text.
Model the strategy
- I know that one of my inquiry questions is, “What type of environment does my plant thrive in?”
- I know that environments are sometimes called habitats, ecosystems, biomes, and places. I also know that the word thrive is similar to the words live, survive, and grow. I can keep all these keywords in mind when I skim and scan the text. If I see one of these words or a word that seems similar to one of my key words, I slow down and start reading.
You also might model the following:
- Identifying a piece of information from one of the texts that helps answer an example research question, e.g., In the EPIC eBook Prickly Plants: Stuck! By Ellen Lawrence, page 4 contains a sentence that would help answer the inquiry question above (“What type of environment does my plant thrive in?”): “A cactus is a type of plant that can survive in hot dry places. Most cactuses, or cacti, grow in rocky or sandy deserts.”
- Recording a piece of information on a model Inquiry Chart.
- Recording the title, author, and URL for a source on a model Inquiry Chart.
-
Inquiry Circles
OVERVIEW
Scientists identify inquiry questions and record their data in an organized manner. Today learners will be introduced to the Inquiry Charts they will use as they investigate representative plants. You may want to model how to use the Inquiry Chart. A sample of the Inquiry Chart for the teacher is provided below and can be used to create a larger version on chart paper so that it can be seen easily by the whole class, or it can be displayed on a large screen with a projector. In future lessons, the teacher will use cacti (and resources about cacti) to model the various strategies. The teacher might also consider creating a model Inquiry Chart using cacti as the inquiry topic.
A true inquiry allows learners to develop their own inquiry questions. The resources compiled for this inquiry investigation center around four main topics: plant life cycles, plant habitats, plant structures and their functions, and plant classification.
At this point, each team has chosen one representative plant to learn more about. The teams will generate questions about their chosen plant that can be answered by the available resources. For example, a team learning more about ferns might create questions about a fern’s life cycle, habitat, structures and their functions, and classification. Learners may develop additional questions that can be added to the Inquiry Charts. If children are having difficulty generating questions, the following sample questions might be used as examples. Children should be encouraged to make these questions their own rather than copying them word for word:
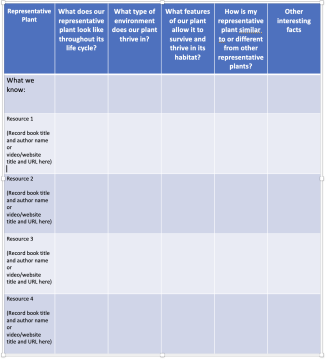
- What does your plant look like throughout its life cycle?
- What type of environment does your plant thrive in?
- What structures of your plant allow it to survive in its habitat?
- How is this representative plant the same or different from other representative plants?
At this point, you may be wondering why learners will select from these particular plants (mosses, ferns, conifers, and flowering plants). These particular plants are intended to be representative examples of the much broader groups of plants that have existed on Earth (nonvascular plants, vascular plants, gymnosperms, and angiosperms). We selected these representative plants to highlight examples that children are likely to have encountered in their lives.
PROCEDURE
Each italicized statement below contains suggested wording the teacher may choose to use for the lesson; additional teacher actions and considerations are in parentheses.
Before Inquiry Circles
- (Ask Equipment Directors to gather the team Inquiry Chart and writing tools. Once all items have been distributed, the teacher will tell each team which representative plant they have been assigned.)
- You will work in the same team every day during Inquiry Circles. Now that you know which representative plant your team has been assigned, please write the name of the plant in the top left corner (square labeled “Representative Plant”) of the Inquiry Chart along with the names of each team member.
- Notice that the team Inquiry Chart looks just like the class Inquiry Chart we discussed during the mini-lesson. Today we are going to start a guided inquiry. You can see along the top of the inquiry chart, there are four column headers where you will write your inquiry questions as well as a column for other interesting facts.
During Inquiry Circles (20 minutes)
- We have a variety of resources available for our inquiry. We have texts where we can find information about the life cycles, habitats, structures and functions, and classification. (You might want to give a brief explanation of these terms as you guide children in generating questions.) In your teams, you will first come up with questions that you will answer as you find out more about your chosen representative plant.
-
- What would you like to know about your plant’s life cycle? Decide as a team and write your question in the second column header on your Inquiry Chart.
- What would you like to know about your plant’s habitat? Decide as a team and write your question in the third column header on your Inquiry Chart.
- What would you like to know about your plant’s structures and their functions? Decide as a team and write your question in the fourth column header on your Inquiry Chart.
- What would you like to know about your plant’s classification? How is it the same or different from other plants? Decide as a team and write your question in the fifth column header on your Inquiry Chart.
- You can add additional findings in the column titled “Other Interesting Facts.”
- If you have more questions about your representative plant, you can add additional columns.
- Take a few moments to discuss what you already know about your representative plant. Perhaps you know something about the environment in which in which these types of plants grow or about their physical characteristics. The Lab Director will lead the discussion. Be sure everyone has a chance to share. Do not write anything on your inquiry chart just yet. (While teams are working, walk around the room and assist learners as needed.)
- Everyone should assist the Data Scientist in recording what you already know in the correct column. For example, if you already know something about your plant’s life cycle, you record it in the first column. If you know something about the environment the plant lives in, record it in the second column. If you know something that doesn’t fit into these inquiry questions, record it in the “other interesting facts” column. (While teams are working, walk around the room and assist learners as needed.)
After Inquiry Circles (10 minutes)
- As we conclude our inquiry circles for today, each team will have a chance to share what they already know about their representative plant, as well as what they accomplished and learned. The Lab Director will lead the discussion about today’s results and the Data Scientist will share the team’s responses with the class. (You may want to post or project a guiding list of questions for learners to use during their team discussions. The following questions may be used, though you may add any of your own based on your class’s needs: What did the team already know about its representative plant? What problems did the team encounter? How did the team resolve those problems? What new information did other team members share that you did not already know? What new questions came up during the discussion?)
- The Data Scientist will now share with the entire class either something the team learned about their ecosystem or any new questions that came up.
- (After all teams have shared, thank them for their hard work, and point out any excellent behaviors that you observed. If you notice any problems in the teams during the lesson, take a moment to point them out, and explain your expectations for all future inquiry circles. Collect all Inquiry Charts or have learners put them in their normal classroom place for on-going work so they can easily access them.)